
Table of Contents
ToggleShipping container tiny houses have evolved from a niche trend into a legitimate, practical housing solution for DIY builders and homeowners seeking affordable, sustainable living spaces. What started as creative repurposing of industrial cargo containers has matured into a design-forward movement with proven construction methods, proven durability, and growing code acceptance. Whether you’re drawn to the environmental appeal, the cost efficiency, or the challenge of maximizing compact square footage, building a container home requires honest planning, realistic budgeting, and a willingness to tackle both technical and design decisions head-on.
Key Takeaways
- A shipping container tiny house uses repurposed 20- or 40-foot steel cargo containers to create a durable, affordable home with predictable dimensions and proven structural integrity that eliminates traditional framing challenges.
- Building a shipping container tiny house typically costs $1,500–$5,000 per container plus labor and finishes, making it more affordable than traditional construction while extending containers’ lifespan through sustainable reuse.
- Zoning and permit requirements vary dramatically by jurisdiction—contact your local building department early, as some areas fast-track container homes as ADUs while others require engineering stamps and variances.
- Interior insulation strategy is critical: spray foam offers R-6.5 per inch but costs $1–$2 per square foot, while batts or rolls cost less but require an air barrier and structural studwalls to prevent condensation on steel.
- Maximize compact square footage through vertical storage, lofted sleeping areas, bright finishes, and mechanical ventilation systems (HRVs) to prevent moisture buildup and maintain livability in sealed, insulated spaces.
- Windows, skylights, and layered artificial lighting are essential in shipping container tiny homes to overcome the confined feel and improve natural light, safety (egress windows), and psychological comfort.
What Is A Shipping Container Tiny House?
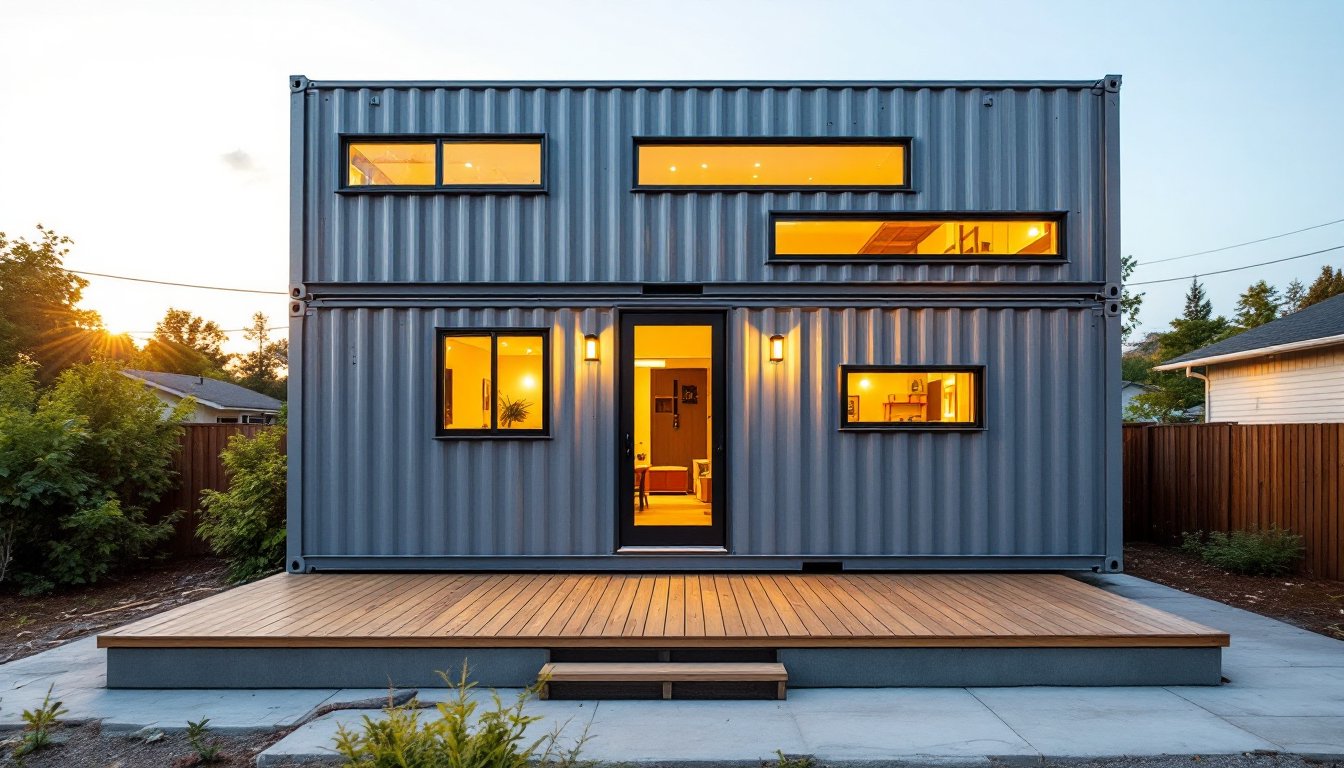
A shipping container tiny house is a residential dwelling constructed primarily from one or more repurposed steel cargo containers, typically 20-foot or 40-foot ISO standard units. These containers arrive with a structural steel frame, corrugated steel walls, and a plywood floor that can serve as the foundation for living space.
A single 20-foot container yields roughly 160 square feet of interior floor space (internal dimensions approximately 19’4″ × 7’8″), while a 40-foot unit provides around 320 square feet. Most DIY projects stack or combine two or more containers to create 400–800 square feet of usable living area, which qualifies as a “tiny house” under most definitions.
The appeal lies in starting with a structurally sound shell: the steel frame handles load-bearing duties, the corrugated walls provide lateral bracing, and the floor is already rated for foot traffic. From there, builders cut openings for windows and doors, insulate the interior, install mechanical systems (electrical, plumbing, HVAC), and finish with drywall, flooring, and fixtures. The result is a compact, durable home that can be moved, stacked, or positioned on a foundation.
Why Choose A Container Tiny House Over Traditional Housing
Container homes appeal to DIY builders for several practical reasons. First, the structural skeleton is already engineered and certified to withstand extreme stress, containers are designed to stack and survive ocean transport. Second, they offer faster build timelines than site-built homes because the heavy lifting (framing) is done. Third, the footprint is predictable: you know the exact dimensions before you break ground.
Compare this to a traditional wood-frame house: a builder must source lumber, account for shrinkage and settling, install headers over openings, and engineer load paths. With a container, the load-bearing work is inherent to the steel structure. That said, containers aren’t a shortcut to zero planning, you still need insulation, proper ventilation, thermal breaks at connection points, and careful detailing where steel meets the weather.
Cost Savings And Sustainability
A used 20-foot container costs roughly $1,500–$3,500 depending on condition and location (prices fluctuate with scrap steel and shipping markets). A new, “One-Trip” container (shipped once) runs $3,500–$5,000. Compare that to the material cost of framing lumber and sheathing for a 160-square-foot shed, many traditional small structures approach similar or higher costs for less durability.
Resourcefulness matters here: many used containers show cosmetic wear (rust, dents, old paint) but are structurally sound. A cost-conscious builder can acquire a weathered container for under $2,000, spend $200–$400 on sandblasting and rust-inhibiting primer, and inherit a corrosion-resistant shell.
Sustainability comes from reuse, salvaging a container keeps it out of scrap yards and extends its lifespan. But, don’t overstate the green factor: shipping containers are energy-intensive to produce, and thermal performance depends entirely on insulation strategy (more on that below). A poorly insulated container home uses more energy than a code-built traditional home. Done right, though, the compact footprint, reduced material waste, and potential for solar integration create genuine environmental advantages.
Essential Steps To Design Your Container Tiny Home
Before cutting steel, lock in your design, site requirements, and local code pathway.
Planning, Permits, And Layout Fundamentals
Start by identifying where your container home will live. Zoning codes vary dramatically: some jurisdictions treat container homes as accessory dwelling units (ADUs) with expedited approval, while others categorize them as manufactured housing or require a variance. Contact your local building department early, this isn’t optional bureaucracy, it’s the gatekeeper to a legal, insurable, mortgageable home.
Permits typically require engineering stamps, especially if you’re stacking containers, removing walls, or installing heavy mechanical loads. A structural engineer familiar with container design (they exist, look for firms experienced with alternative housing) will charge $1,500–$4,000 for calculations and signed drawings. This feels expensive until your home is condemned because the roof framing wasn’t properly tied into the steel structure.
Layout is where compact living becomes an art. A 160-square-foot container demands ruthless prioritization: bedroom, bathroom, kitchen, living area, and storage each claim a slice. Sketch a floor plan at scale (1/4″ = 1 foot) on graph paper or using free tools like Apartment Therapy’s small-space design guides to test furniture placement and traffic flow before you commit to wall positions.
Key layout rules: locate the bathroom near plumbing entry points to minimize runs of supply and drain pipe (expensive and space-consuming). Put the kitchen on an exterior wall if possible for fresh air and a window. Bedrooms need egress windows (operable, code-required emergency exits) sized per local fire code, usually a minimum 5.7 square feet and a sill height no higher than 44 inches above the floor. Plan for adequate headroom: containers are 7’6″ tall inside, but insulation, mechanical conduit, and finished ceiling eat into that, often leaving 7’2″–7’4″ of usable height.
The Build Process: From Container To Living Space
The build follows a logical sequence: prep, weatherproofing, framing, MEP (mechanical, electrical, plumbing), and finish.
Preparation and Sandblasting:
When your container arrives, inspect it closely. Look for rust perforation (holes, not surface scaling), structural dents that prevent doors from closing, or damage to the roof. Light surface rust is normal: treat it by wire-brushing or sandblasting, then apply two coats of rust-inhibiting epoxy primer (brands like Rust-Oleum Epoxyshield work for containers). Sandblasting costs $200–$600 depending on container condition and regional labor rates.
Remove the original wooden floor if it’s rotted or compromised: if it’s solid, you can keep it as a working substrate and pour self-leveling epoxy over the top, then install underlayment and finished flooring. Plan for a moisture barrier, a 6-mil polyethylene sheet sealed at seams, to prevent concrete wicking and condensation on the steel pan below.
Cutting Openings and Insulation:
Mark window and door locations from your approved plans. Use a reciprocating saw with a metal-cutting blade (coarse-tooth bi-metal, not carbide) to cut openings: wear safety glasses, heavy-duty work gloves, and a dust mask because steel shavings are sharp and the work is loud. For larger openings (rolling doors, full-height windows), rent a plasma cutter or hire a metal fabrication shop, cleaner cuts and more control than handheld tools.
Insulation choice is critical. Many builders use closed-cell spray polyurethane foam (SPF) applied directly to the interior steel walls: it adheres well, seals air leaks, and provides an R-value of roughly R-6.5 per inch. A 2-inch coat yields R-13, enough for many climates when paired with thermal breaks at studs. The downside: SPF costs $1–$2 per square foot installed and requires a licensed applicator in most jurisdictions.
Alternatively, use batts or rolls of fiberglass or mineral wool (R-3.5 per inch) supported by a studwall frame built inside the container. This is cheaper ($0.30–$0.50 per sq. ft. for material) and allows you to hide wiring and plumbing within cavities, but it requires an air barrier (vapor-permeable housewrap or foam sheathing) to prevent condensation on the cold steel. The studwall eats floor space, typically 2–3 inches per wall, so plan accordingly.
Interior Design And Space Optimization Tips
Tight square footage demands multi-functional design and honest material choices.
Maximize Vertical Space:
Use tall shelving and wall-mounted storage instead of floor-based cabinets. Lofted sleeping areas are standard in container homes, an elevated bed over a living or work zone reclaims floor space below. Ensure loft framing is solidly anchored to the container frame and engineered to handle the distributed load (typically 40–50 lbs per square foot for residential bedrooms per building code).
Finishes That Work:
Containers benefit from industrial aesthetics, but practicality wins. Exposed corrugated steel walls are trendy until they’re cold, noisy, and prone to condensation. Drywall, even thin 3/8″-thick sheets, adds insulation, sound control, and finished surfaces. Paint bright, matte finishes to reflect light and reduce the cave-like feel. Large, strategically placed windows and skylights (sealed, tempered glass) transform the experience.
Flooring: Concrete epoxy, polished concrete, or sealed concrete slab reads industrial and is easy to clean but can feel cold underfoot. Vinyl plank flooring (luxury vinyl plank, or LVP) offers warmth, durability, and water resistance in a thin profile that doesn’t eat headroom. Avoid carpet in a shipping container home unless moisture control is flawless: condensation and trapped humidity invite mold.
Lighting and Ventilation:
Natural light through windows and skylights is non-negotiable for small spaces, it expands perception and improves mood. Layer artificial lighting: recessed or flush-mount fixtures for general light, and task lighting (under-cabinet LEDs in the kitchen, reading sconces in the bedroom). All wiring must be run in conduit or installed in wall cavities and covered by drywall: the NEC (National Electrical Code) treats container homes like any other building, requiring proper protection and grounding.
Ventilation prevents moisture buildup. Install a balanced ventilation system (heat-recovery ventilator, or HRV) that exhausts stale air from bathrooms and kitchen while drawing fresh air into living and sleeping zones. This is especially critical in sealed, insulated containers where air exchange is limited. Many codes now require mechanical ventilation in tiny homes: check your jurisdiction’s requirements.